You can sign up at https://www.zoho.com/mail/zohomail-pricing.html and scroll down for Forever Free Plan, select Sign up now and enter your domain name. Make sure Sign up with a domain name I already own has been selected.
Next you’re directed to a sign-up form. Note that the Contact Email needs to be an alternative e-mail address you’re already using in order to be able to activate your account. After sign-up you’ll receive an e-mail with the verification link through which you can activate your Zoho account.
Domain verification
Once the account has been created you need to verify ownership of your domain. Select your domain’s DNS Manager from the drop-down menu (for Voog it’s Others) and choose CNAME Method for verification. You’ll see the following information below:| Name / Host / Alias / CNAME: | Value / Points To / Destination: |
| zb******** | zmverify.zoho.com |
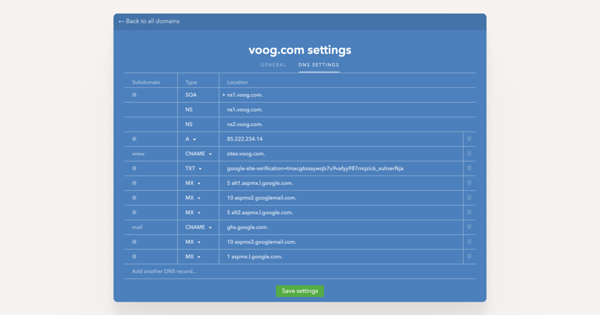
Note that zb******** is a unique code that’s different for every domain and instead of zmverify.zoho.com the Destination could also be zmverify.zoho.eu. Copy these two values and go to Settings > Domains on your Voog site and open the DNS Settings of your domain. You need to add a new DNS record with the following information:
| Subdomain: | Type: | Location: |
| zb******** | CNAME | zmverify.zoho.com. |
The address you use for Location needs to have a full stop at the end. Once the CNAME record has been added, return to Zoho and press Proceed to CNAME verification. Now you’ve set up your Zoho e-mail service.
MX records
For a fully functional e-mail service you need to add MX-records for your domain. You’ll find the records on your Zoho setup page when you select Configure Email Delivery from the menu on the left. There you’ll see a list of MX-records with a priority number assigned to each. You need to add each MX-record as a separate entry in the DNS settings page of your Voog site. The basic process is the same as was with the CNAME-record and the information you need to fill in is as follows:| Subdomain: | Type: | Location: |
| @ | MX | 10 mx.zoho.com. |
The Subdomain and Type values for MX-records are always @ and MX, respectively. Make sure you fill in Location with both the priority number and MX-record with a space between them and a full stop at the end, just like in the example above. Once the MX-records have been added, you’ve successfully launched your Zoho Mail service.


